So you’ve heard about Mix and Match Products — or maybe you’ve been browsing WooCommerce extensions looking for a way to let customers build their own bundles — and you’re wondering how complicated it actually is to get something live.
Good news: it’s not complicated at all. In fact, with the right setup, you can have a fully functional Mix and Match product on your store in about 10 minutes. We’re going to walk through the whole thing together, using a real example: a custom 6-pack of craft beverages.
Whether your store sells craft beer, specialty sodas, hot sauces, candles, or coffee pods, the process is exactly the same. Let’s go.
What We’re Building
By the end of this guide, your customers will land on a product page, see a selection of individual beverages, pick any 6 they like, and add the whole thing to their cart as a single order.
Here’s the quick overview of what that requires:
Install and activate the plugin
Make sure your individual products exist
Create the Mix and Match container
Configure pricing, sizing, and your product list
Preview it and you’re done
That’s it. Five steps, 10 minutes, real product. Let’s get into it.
Before You Start
You’ll need:
WooCommerce installed and running (version 8.2 or higher)
Mix and Match Products purchased and installed (WordPress 6.2+ and PHP 7.4+ required)
The individual products you want customers to choose from — in our case, the individual drinks in the 6-pack
Step 1: Install and Activate the Plugin (~2 minutes)
If you haven’t installed Mix and Match Products yet, here’s how:
Go to WooCommerce.com → My Account → Downloads
Download the Mix and Match Products .zip file
In your WordPress admin, go to Plugins → Add New → Upload Plugin
Upload the zip, click Install Now, then Activate
That’s all there is to it. No configuration wizard, no complicated setup screen — once it’s active, the new product type is immediately available.
Step 2: Set Up Your Individual Products (~2 minutes)
Mix and Match Products work by pulling in your existing WooCommerce products as the items customers choose from. In our 6-pack example, each individual drink (an IPA, a pale ale, a lager, etc.) needs to exist as its own product.
If you’ve already got products in your store, you might be done with this step entirely. If not, go ahead and create them as simple products the same way you normally would in WooCommerce. You don’t need to do anything special to these products — Mix and Match handles the rest.
Tip: If you only want these products available inside a Mix and Match bundle (not purchasable on their own), check out the Not Sold Separately mini-extension — it’s a handy companion for this exact scenario.
Step 3: Create the Mix and Match Container (~1 minute)
Now for the main event. This is the product your customers will actually visit and configure.
Go to Products → Add New
Give it a name — something like “Build Your Own 6-Pack”
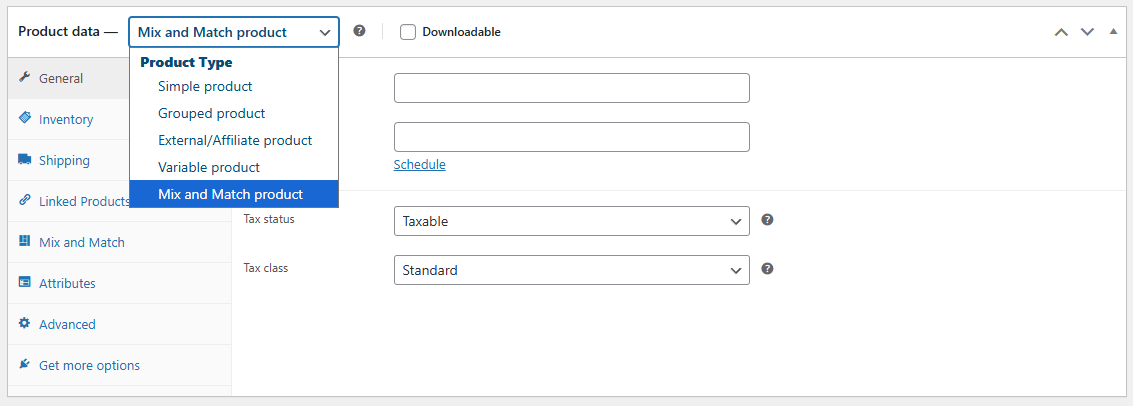
In the Product Data panel, open the product type dropdown (where it normally says “Simple product”) and select Mix and Match
That’s the key step. As soon as you select Mix and Match, the product data panel will update with new tabs specific to this product type. You’re ready to configure.
Step 4: Configure Your Mix and Match Product (~4 minutes)
This is where you define exactly how your 6-pack works. There are three things to set up: the size, the pricing, and the product list.
Layout
The first field in the tab is Layout, which controls how the Mix and Match product displays on the frontend. You can leave this at the default for now — it’s easy to revisit later if you want to customize how things look.
Set the Container Size
In the Mix and Match tab, you’ll see fields for Minimum Container Size and Maximum Container Size.
For a strict 6-pack, set both to 6. This means customers must select exactly 6 items — no more, no less — before they can add to cart. If you want to offer more flexibility (say, 4–12 items), you can set different min and max values.
Add Your Products
Next is the Allowed Content field, where you decide how you’ll populate the container. You have two options:
Select individual products — You handpick exactly which products appear in the container. Best for curated selections like our 6-pack, where you want to control precisely which drinks are on offer.
Select product categories — Any product belonging to the selected category automatically becomes an option. Great for stores with large or frequently changing catalogs, where manually maintaining a product list would be a headache.
For our 6-pack, select Select individual products. A Select products field will appear — type to search, and select your drinks one by one. They’ll show up as tags in the field, each with their SKU alongside the product name so you can confirm you’ve got the right ones.
Tip: You can drag and drop the product tags within the field to set the display order — whatever order you arrange them here is the order customers will see them on the product page.
Choose a Pricing Model
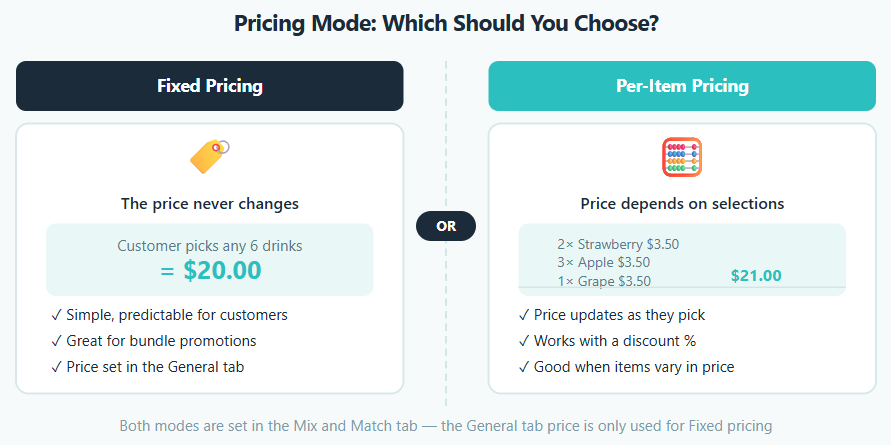
You have two options here, and which one you pick depends on how you want to price your bundle:
Per-item pricing — The container price is calculated by adding up the prices of whatever the customer selects. Each drink keeps its own price, and the total updates dynamically as they build their pack.
Fixed pricing — You set one flat price for the entire container in the General tab, regardless of which products the customer picks. Great for a “any 6 for $20” deal.
For a typical 6-pack promotion, fixed pricing often works best — but the choice is yours.
Want to offer a bundle discount? With per-item pricing, you can set a discount percentage directly on the container product. This applies a global discount across all child products in the bundle — a simple way to reward customers for buying in bulk.
Step 5: Preview and Test (~1 minute)
Click View Product to see your Mix and Match product on the frontend. You should see:
Your product name and description
A list of all the drinks you added, each with a quantity input
A running count showing how many items have been selected out of 6
An Add to Cart button that only activates once exactly 6 items are chosen
Try building a pack yourself. Select your 6 items, add to cart, and confirm everything flows through to the cart and checkout correctly. Especially check the price — make sure it matches what you’d expect based on your pricing model.
If everything looks good, you’re done. Your customers can now build their own 6-pack.
What’s Next?
You’ve got a working Mix and Match product — but the plugin has a lot more to offer. A few things worth exploring once you’re comfortable with the basics:
Display settings — Switch between a grid and a list layout, or adjust the Customizer settings to better match your theme
Inventory management — Mix and Match respects WooCommerce’s stock management on child products, so if a drink sells out, it won’t be selectable
Variable Mix and Match — Want to offer multiple pack sizes — say, a 4-pack, 6-pack, and 12-pack all from one product page? The Variable Mix and Match mini-extension makes that possible by letting you create Mix and Match products with selectable size variations.
Shipping — You can ship the container as a single unit or calculate shipping based on individual items — your call
If you don’t have Mix and Match Products yet, grab it on WooCommerce.com. It’s the easiest way to offer customizable bundles on a WooCommerce store — and as you just saw, getting your first product live really does take about 10 minutes.
If you run into any questions while setting things up, the documentation is a great first stop. And if you get stuck, our support team is here to help.
All Products for Subscriptions is now part of WooCommerce Subscriptions 9.0 at no extra cost. Here is what changed, what to do with the standalone extension, and what it means for Mix and Match and Name Your Price stores.
Luiza Kirk, a Qi Gong and Yoga instructor from London, has always believed that everyone should have access to tools that enhance their physical and mental well-being. Although she’s been a long-time practitioner of Qi Gong and Yoga, and has been a teacher for more than twenty years, her mission to bring these practices to…
Are you tired of losing money from excess inventory? Want to increase profits while keeping customers happy? Look no further than Mix and Match, the amazing plugin designed for online retailers. Meet Hannah, the extraordinary founder of “Not Your Grandma’s” – a business that revolutionizes compression socks. As a proud disabled woman, Hannah wanted to…
This release resolves issues affecting compatibility with the Force Sells extension, including a fatal error and incorrect validation behavior when containers include forced products.
A maintenance release: two 2.9.0 regressions fixed (print documents failing on older Print Invoices & Packing Lists versions, a PHP warning on order lookups), packing mode stored on admin-built orders, and the first building block for automatic translation updates.