Fixed Price vs. Per-Item Pricing: Which Should You Choose?
When you create a Mix and Match product, one of the first decisions you’ll make is how to price it. The Pricing mode field gives you two options: Fixed — the price never changes, and Per-item — the price depends on the selections. The names are accurate, but choosing the right one means understanding what each actually does to your cart and checkout.
This article explains both modes, walks through when each one makes sense, and shows you how to configure them.
How the two pricing modes work
Fixed pricing
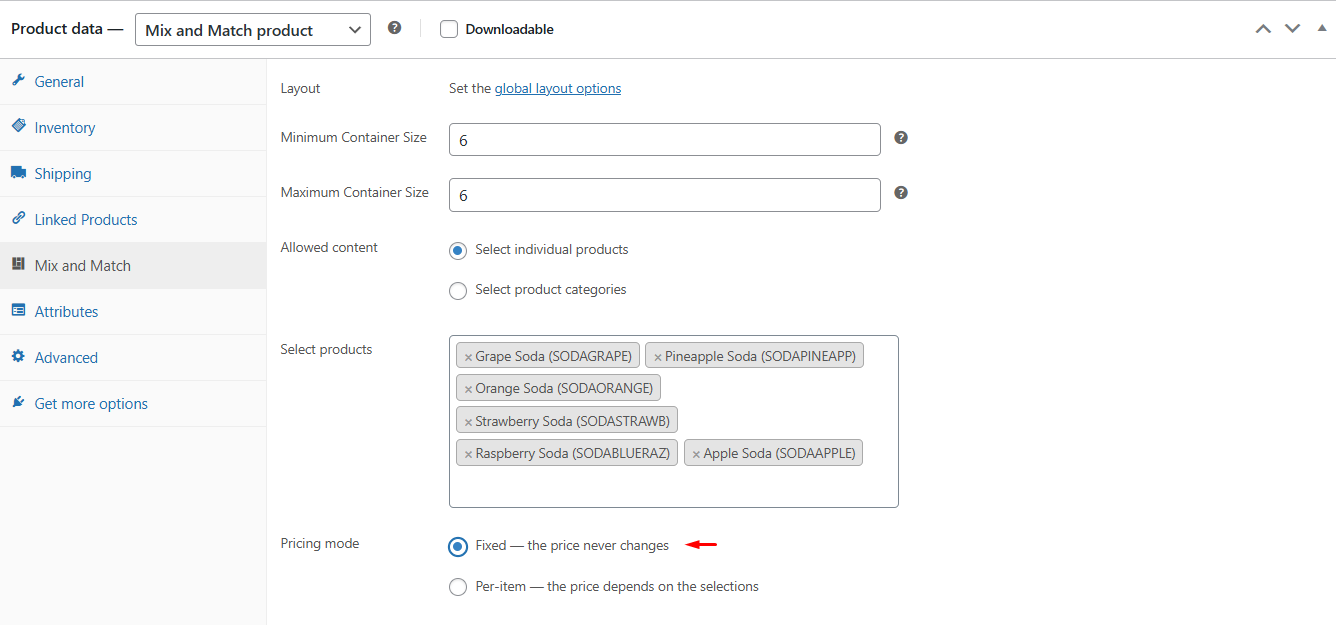
In fixed pricing mode, you set a single price for the container — and that’s the price, regardless of what your customer puts in it. The Regular price field on the General tab is the price they pay.
At cart time, the individual child products don’t contribute any price of their own. Even if each item has its own price set in WooCommerce, those amounts are zeroed out when the product is added to a fixed-price container. The customer sees one line item, one price.

Per-item pricing
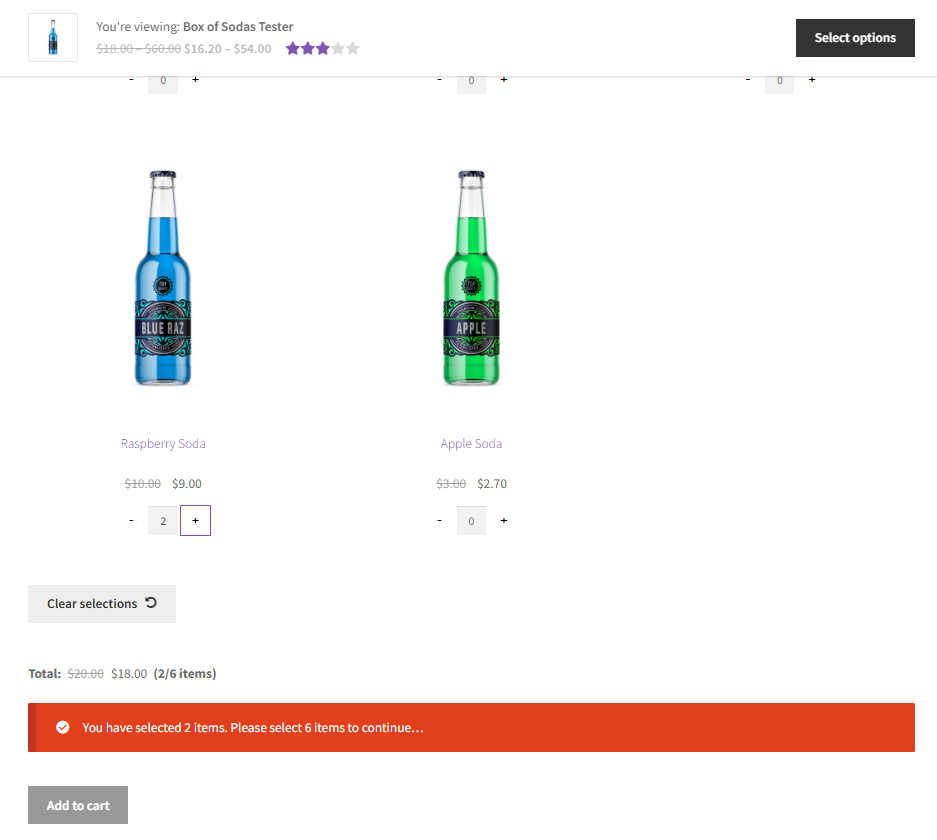
In per-item pricing mode, the container price is the sum of whatever your customer selects. Each child product brings its own price to the total, and the displayed price updates live on the product page as the customer fills the container.
You can also set a Regular price on the General tab in this mode — but here it works as an optional base price that gets added to the child product sum. If you leave it blank (or set it to $0), the container starts at $0 and builds from the child products alone.
There’s a third lever available exclusively in per-item mode: the Discount field in the Mix and Match tab. Enter a percentage there and the plugin applies it to all child products when the container’s quantity requirements are satisfied.

When to use fixed pricing
Fixed pricing is the right choice when the price should stay constant regardless of what’s inside the container.
Use fixed pricing when:
- You’re selling a curated bundle at a set retail price — a gift box, a starter kit, a case — where the value is in the set, not the individual items
- Your child products have individual prices, but those prices shouldn’t be visible or meaningful in the context of the bundle
- You want pricing simplicity: one price, always, no matter what the customer picks
- Your profit margin is already calculated into the container price, and you don’t want child product pricing to complicate that
A wine shop selling a “Pick Any 6” bottle for a flat $89 is a good example. The individual bottles might each be priced at $15–$25 in your catalog, but the bundle price is the bundle price.
When to use per-item pricing
Per-item pricing is the right choice when the container’s value should reflect what’s actually in it — and when different selections should cost different amounts.
Use per-item pricing when:
- Your child products have meaningfully different prices, and you want the total to reflect those differences
- You want customers to see the price building as they make selections — it’s transparent, and it sets accurate expectations before checkout
- You want to offer a discount on the bundle versus buying items individually (use the Discount field for this)
- You’re building a “create your own” experience where the contents genuinely vary in cost — a meal kit builder, a skincare routine selector, a mixed case of specialty items
Note: The per-item discount applies to all child products in the container. It’s not item-specific — if you apply a 10% discount, every child product in that container gets 10% off. If you need more granular control, that would require custom development.
A quick way to decide
If you’re still not sure, run through this:
| Question | If yes → |
|---|---|
| Does the price change based on what’s selected? | Per-item |
| Is the price fixed no matter what’s inside? | Fixed |
| Do you want to show customers a running total? | Per-item |
| Do you want to offer a bundle discount? | Either |
| Are you selling a set product at a set price? | Fixed |
Most store owners settle on one mode per product type and stick to it. The two modes solve different problems — they’re not better or worse than each other.
How to configure your pricing mode (~3 minutes)
Pricing mode is set per product, in the Mix and Match tab of the product editor.
Setting up fixed pricing
- Open the product editor for your Mix and Match product.
- Go to Product data → Mix and Match tab.
- Under Pricing mode, select Fixed — the price never changes.
- Set your container price in the General tab → Regular price field. This is the price your customers will pay.
- Save the product.
Tip: Your child products can still have their own prices in WooCommerce — those prices are used if the same products are sold outside of a container. They just won’t affect the container price in fixed mode.
Setting up per-item pricing
- Open the product editor for your Mix and Match product.
- Go to Product data → Mix and Match tab.
- Under Pricing mode, select Per-item — the price depends on the selections.
- The Regular price field in the General tab is now an optional base price. Leave it blank (or set it to $0) if you want the container price to come entirely from child products.
- Save the product.
Make sure each child product you’ve added to the container has a price set — otherwise it will contribute $0 to the total.
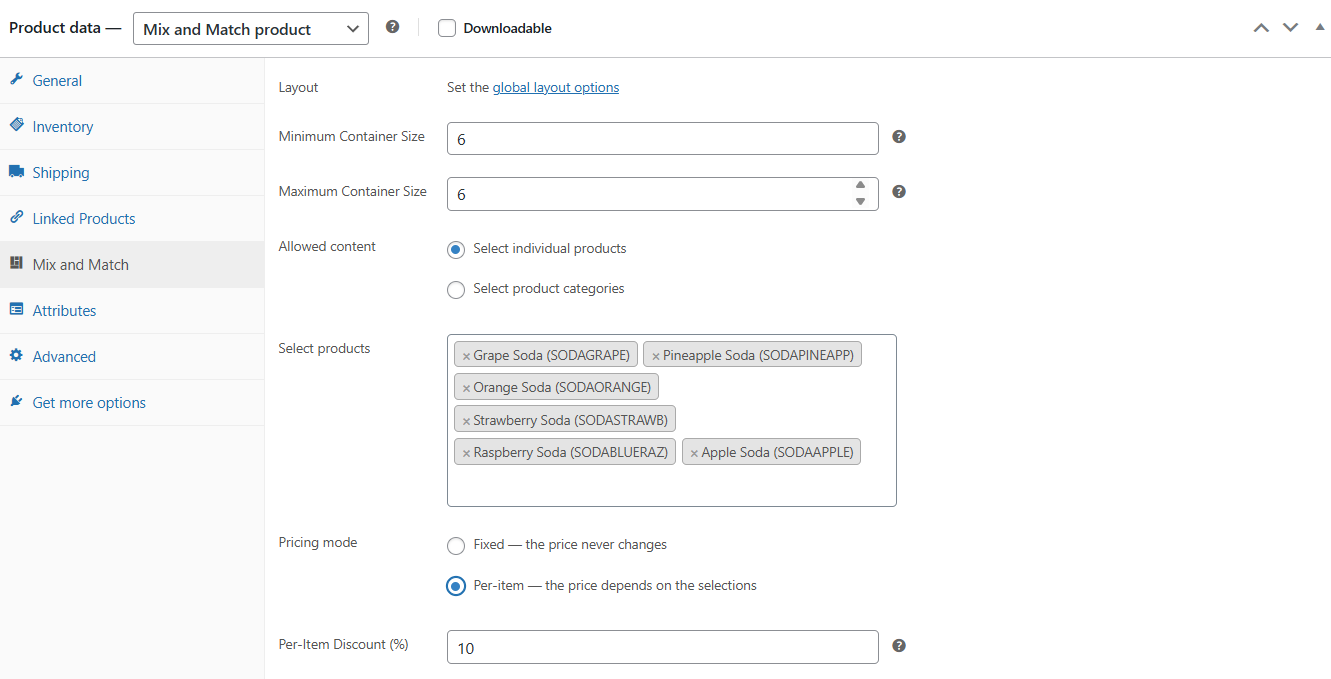
Adding a per-item discount (optional)
If you want to offer a percentage discount when customers fill the container, use the Discount field that appears below the Pricing mode field when Per-item is selected.
- Enter a number (no % sign) in the Discount field — for example,
10for a 10% discount. - The discount applies to all child products once the container’s quantity requirements are met.
- Save the product.
The discount shows up on the product page and in the cart, so customers can see they’re getting a deal compared to buying the same items individually.
What’s next?
- How to Set Up Your First Mix and Match Product — if you haven’t created a container yet, start there
- Mix and Match Products documentation — full reference for all product settings
- Mix and Match Products on WooCommerce.com — if you’re evaluating whether the plugin is right for you
If you run into questions while setting up your pricing, open a support ticket and we’ll take a look.